A malfunctioning Garage Door Sensor can be frustrating and even dangerous. These small but essential devices play a critical role in your garage door system by preventing the door from closing when something is in its path. If your garage door refuses to close, reverses unexpectedly, or shows blinking lights near the floor, your Garage Door Sensor may be the culprit.
In this guide, we’ll explore the most common reasons your Garage Door Sensor is not working and provide practical solutions to restore proper operation. Whether you’re dealing with alignment problems, wiring issues, or environmental interference, this comprehensive article will help you diagnose and fix the issue efficiently.
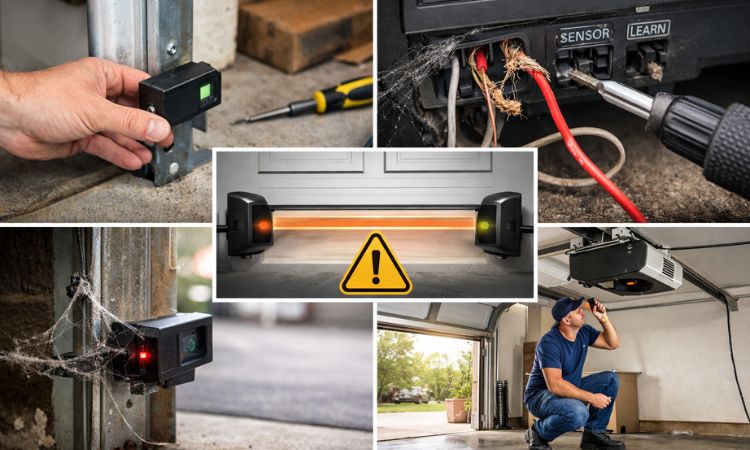
What Is a Garage Door Sensor and How Does It Work?
Before diving into troubleshooting, it’s important to understand how a Garage Door Sensor functions.
Most modern garage doors use photo-eye sensors installed about six inches above the floor on both sides of the door track. These sensors create an invisible infrared beam between them. If the beam is interrupted while the door is closing, the system automatically reverses the door to prevent injury or damage.
When your sensor isn’t working correctly, the door may:
- Refuse to close completely
- Reverse immediately after starting to close
- Flash indicator lights
- Require you to hold down the wall button to close
Let’s explore why these issues occur.
Common Reasons Your Garage Door Sensor Is Not Working
1. Misaligned Sensors
One of the most common reasons a Garage Door Sensor stops working is misalignment. Because the sensors must face each other perfectly, even a slight bump from a trash bin, bicycle, or tool can knock them out of alignment.
Signs of misalignment:
- One sensor light is off or blinking
- The door starts to close but reverses
- The door won’t close unless you hold the wall switch
If the sensors are not directly facing each other, the beam won’t connect, and the system will interpret it as an obstruction.
2. Dirty or Obstructed Sensor Lenses
Dust, cobwebs, dirt, or debris can block the infrared beam. Garage environments are prone to dirt buildup. Over time, even a thin layer of dust on the lens can interfere with the beam and prevent the Garage Door Sensor from functioning properly.
Common obstructions include:
- Spider webs
- Leaves
- Storage items
- Tools leaning against the wall
A simple cleaning can often restore normal operation.
3. Loose or Damaged Wiring
Wiring issues are another frequent cause of Garage Door Sensor failure. The sensors connect to the garage door opener via low-voltage wires. These wires can become:
- Loose at the terminal screws
- Frayed or damaged
- Chewed by rodents
- Disconnected during other repairs
If the wiring connection is compromised, the sensors won’t communicate with the opener.
4. Sunlight Interference
Direct sunlight can interfere with the infrared beam. If your garage faces west or south, afternoon sunlight may shine directly into one of the sensors, overpowering the beam signal.
This can cause intermittent problems where the Garage Door Sensor works fine in the morning but fails later in the day.
5. Faulty Sensor Components
Sometimes the issue isn’t alignment or wiring—it’s a defective sensor. Over time, internal components can wear out or fail due to age, moisture exposure, or electrical surges. If your sensors are more than 10–15 years old, they may simply need replacement.
6. Improper Installation
Incorrect installation height or positioning can prevent proper operation. Sensors should typically be installed no more than six inches above the ground. If they’re installed too high, they may fail safety tests or not detect low objects.
7. Garage Door Opener Issues
In some cases, the problem isn’t the Garage Door Sensor at all—it’s the opener. Circuit board failures, blown fuses, or power supply problems can prevent the sensors from functioning properly.
If both sensors appear aligned and powered but the door still malfunctions, the opener may need professional inspection.
How to Fix Garage Door Sensor Issues — Complete Troubleshooting Guide
Now that you understand the common causes, here is a step-by-step troubleshooting process to get your Garage Door Sensor working again.
Step 1: Check the Sensor Lights
Look at the LED lights on both sensors.
- A solid light usually indicates proper alignment
- A blinking or no light suggests misalignment or wiring issues
If one side has no light, start troubleshooting there.
Step 2: Clean the Sensor Lenses
Use a soft cloth and mild cleaner to gently wipe both lenses. Avoid abrasive materials that could scratch the lens surface. After cleaning, test the door again.
Step 3: Realign the Sensors
If one sensor is blinking:
- Loosen the mounting wing nut
- Gently adjust the sensor until the light turns solid
- Tighten the mounting bracket
You may need to adjust both sides slightly to achieve proper alignment.
Step 4: Inspect the Wiring
Turn off power to the opener before inspecting wiring. Check for:
- Loose terminal screws
- Damaged or frayed wires
- Disconnected wires
If you notice visible damage, you may need to splice the wire or replace it entirely.
Step 5: Remove Obstructions
Ensure nothing is blocking the beam between sensors. Move storage items, tools, or other objects that could interrupt the path. Even small objects can prevent proper operation.
Step 6: Test for Sunlight Interference
If the issue occurs during specific times of day, sunlight may be the cause.
Possible solutions include:
- Installing a small sun shield
- Repositioning the sensor slightly
- Adding shade to the garage entrance
Step 7: Reset the Garage Door Opener
Sometimes a system reset can resolve temporary issues. Unplug the opener for 30–60 seconds, then plug it back in and test the door.
Step 8: Replace the Sensors
If all troubleshooting steps fail, replacing the Garage Door Sensor may be necessary. Replacement sensors are typically affordable and can be installed using basic tools. Ensure compatibility with your specific garage door opener model before purchasing.
When to Call a Professional
While many Garage Door Sensor problems can be resolved with basic troubleshooting, professional service may be needed if:
- Wiring is severely damaged
- The opener circuit board is faulty
- You’re unsure about electrical work
- The door behaves unpredictably
A professional technician can quickly diagnose and fix complex issues, ensuring your garage door operates safely.
Queens NY Garage Door Repair – sensor experts 24/7
If you encounter persistent sensor problems or need professional diagnosis, our certified technicians provide same-day service throughout Queens and all NYC boroughs. We handle residential, commercial, and automotive shop sensor systems with precision and speed.
Call (718) 755-5985 for expert sensor service
Upfront pricing, licensed, insured. We serve Astoria, Bayside, Flushing, Long Island City, Forest Hills, Jackson Heights, and all Queens neighborhoods.
Preventing Future Garage Door Sensor Problems
Routine maintenance can help prevent recurring issues.
Maintenance tips:
- Clean sensor lenses every few months
- Check alignment periodically
- Inspect wiring annually
- Keep the garage floor area clear
- Test the auto-reverse feature monthly
Proactive care extends the lifespan of your Garage Door Sensor and enhances safety.
Final Thoughts
A malfunctioning Garage Door Sensor can disrupt your daily routine and pose safety risks. Fortunately, most problems are caused by simple issues like misalignment, dirt buildup, or loose wiring.
By following the troubleshooting steps outlined above, you can often restore proper function without expensive repairs. However, if problems persist, seeking professional assistance is the safest option.
Maintaining your Garage Door Sensor ensures your garage door operates smoothly, protects your family, and prevents unnecessary damage. With proper care and timely troubleshooting, you can keep your garage door system reliable for years to come.
 How to Align Garag..